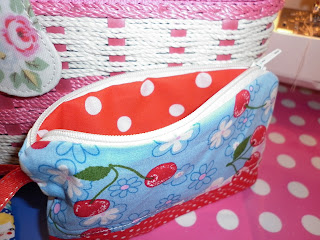
Finally my first tutorial! This is for a lined, zippered purse - it can be made bigger, smaller or any size you like. I hope my instructions are easy to follow.
This is what you will need:
2 x pieces of fabric for the outside of your purse (measuring 12cm x 17cm or 4.7" x 6.7" inches approximately)
2 x pieces of fabric for the lining (same size as the outer purse pieces)
1 x 7" inch/18cm zipper or longer (as long as the zipper "teeth" section is longer than the width of the fabric)
1 x piece of ribbon to co-ordinate with your fabric to use as tag (12cm/4.7"inches long)
Note - I use a 1cm seam allowance, that is included in the measurements above.
 |
| Zipper foot |
 The next step is to sew the lining right side facing up to the same edge of the zip as pictured. (once you are a little more confident you could combine these 2 steps and sew the outside fabric and lining with zip sandwiched between)
Now repeat this process for the other side of the zip.
You may want to iron the purse at this stage, being careful not to iron directly on the zip.
Swap you zipper foot back to your normal presser foot for the rest of the process. Take your piece of ribbon, fold in half, and pin to one piece of the outer fabric. Pin the ribbon on the right side of the outer fabric so it won't get caught when you sew the purse up.
Undo the zipper 3/4 of the way open like this.
Now here is where it gets a little tricky - open up and pin your purse like so, leaving a gap in the bottom of the lining to turn your purse inside out (I have used yellow tailor's chalk to show the gap).
 |
| I hope you can see the yellow tailors chalk! |
To avoid severe 'pinching' around the zip you need to make sure that the zipper teeth are sewn toward the lining. At the open end sit the teeth flat like in this picture:
At the closed end of the zip, 'roll' the zip toward the lining like this:
Now it's time to sew it up! start at the bottom of the lining (leaving a gap) and carefully sew the whole way around finishing at the bottom of the lining.
Clip your corners carefully and trim back the seams (except the seam with the opening), as well as cutting off the excess zipper at each end.
Now the reveal! pull the purse through the gap in the lining and then through the open zipper and hey presto a purse!! Be careful, remember there is a pin in there holding the ribbon tag.
Push out the corners of the outside of the purse.
Now sew up the lining gap, and we're done!
These are great and quick to make, and also you can patchwork the outside of the purse to use up your scraps of fabric. I may have started to breed them! Adjust the size, add milk bottle corners - once you master the basics the only limit is your imagination, Enjoy!!
Don't forget to leave me a comment!
Heidi xo


Heidi! Awesome tutorial. Love it xo
ReplyDeleteGreat work Heidi!!
ReplyDelete